Cross platform
This section explains how to use Apptimize SDKs on all supported platforms.
See also
- Software Development Kits (SDKs) and Apptimize API
App Creation
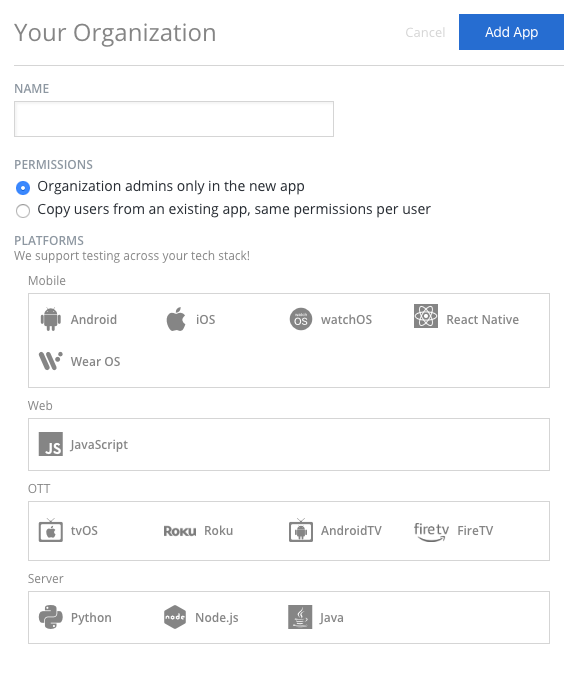
When you log in to Apptimize for the first time, you are prompted to create a new application.
Note
Deprecated behavior
Previously, when creating an app in your Apptimize organization, you selected the platform of the app, such as iOS, Android, tvOS, or Android TV. Each platform had its own dedicated app. Due to the cross-platform nature of our product, all apps are universal now and will apply to all platforms by default.
In Apptimize, an app represents all components of your technical stack so that it can deliver a single experience to end users. It enables defining experiments or feature flags that apply across multiple platforms. Your app can include multiple client-side platforms, such as native mobile, web, and OTT, as well as multiple server-side platforms. When creating a new app within your Apptimize organization, you are generating a single App Key that you may use across all of these platforms.
Tip
Creating more applications
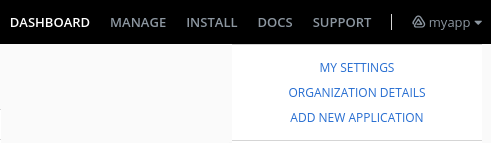
You can create additional applications from the main menu at any time. Click the name of your current application. Then, select ADD NEW APPLICATION from the list of available commands.
Identifying users
With Apptimize Cross-Platform, you can identify your users and ensure that a consistent experience is delivered to them across all your platforms.
Note the following difference in identifying a user between Server-Side and Client-Side SDKs:
Client-Side - Mobile/Web SDKs (Android, iOS, JavaScript)
The User ID is optional and it is best practice to set it on their first login to ensure consistency thereafter.
Server-Side SDKs (Python, Node.js)
The User ID is mandatory for server-side calls to work as it is expected as a required parameter in server-side methods.
See also
- Installation & Setup
Setting User IDs
For every experiment or feature flag that is created, Apptimize checks if the user has been identified with a User ID. The User ID is used for bucketing and ensuring that the experience is consistent for the user. We strongly recommend setting the User ID once known.
You can set and get the User ID with the following methods:
// Sets the User ID based on the variable passed into setCustomerUserId
// Apptimize will use the Anonymous ID for allocation until this property is
// set
Apptimize.setCustomerUserId(userId);

// Returns the userID as a String if it is set, returns null if not set
Apptimize.getCustomerUserId();
When a User ID has not been set, Apptimize assigns a randomly-generated Anonymous ID to the device by default. So, when the User ID is not specified, the Anonymous ID is used to determine allocation instead. Once a User ID is set, the Anonymous ID is no longer used for allocation. However, any previously allocated variants/experiences that the user had seen while anonymous will persist. If you need to know the value of the Anonymous ID at any point, use the following get method:
// Returns the Anonymous ID as a String
Apptimize.getApptimizeAnonUserId();
Note that the Anonymous ID continues to be stored and the User ID can be set to null if you wish to revert allocation to be based on the anonymous ID rather than the user ID.
See also
Feature Flags
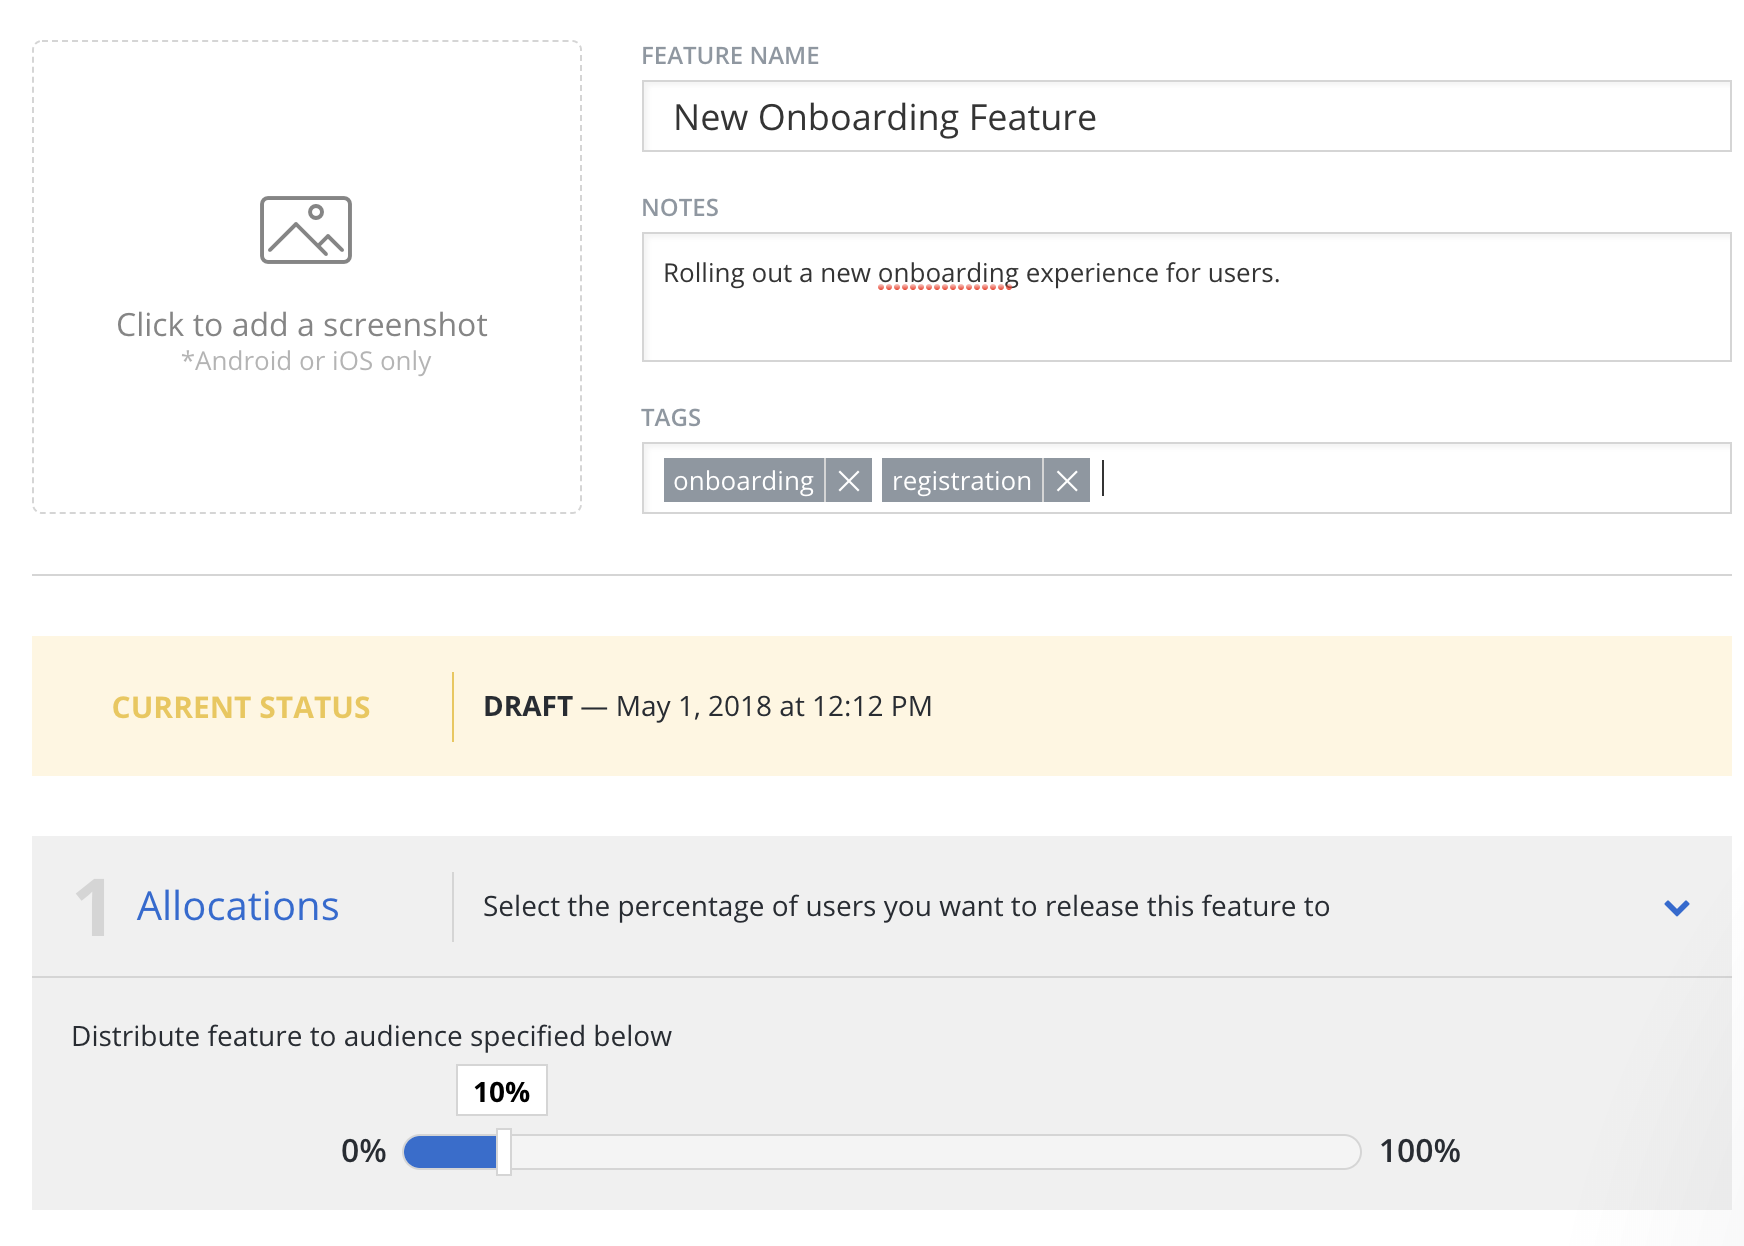
Create a feature flag by clicking the Create button on the top-right corner of your Apptimize dashboard and selecting Feature Flag. Give your feature flag a name and feel free to add notes, tags or a screenshot to help identify your flag.
See our documentation on Feature Flags for a more in-depth explanation.
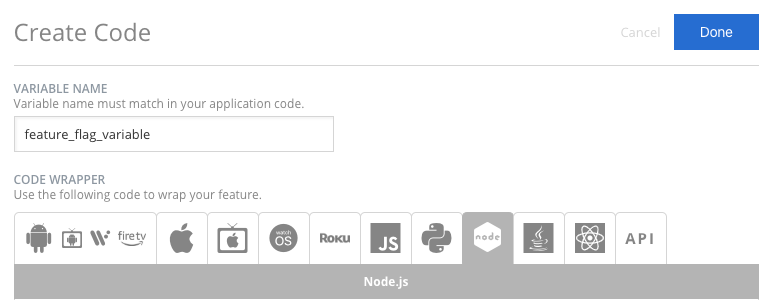
Click Create Code at the top right of the page to generate a code wrapper that you will use to designate your feature flag. Choose a variable name and copy this wrapper to your app code where the feature exists. Using the if-else statement, define what happens in the ON and OFF state of the feature flag:
String userId = "1234abcd";
if (Apptimize.isFeatureFlagEnabled("feature_flag_variable", userId)) {
   // ON
} else {
   // OFF
}
var userId = "1234abcd";
if (Apptimize.isFeatureFlagEnabled("feature_flag_variable", userId)) {
   // ON
} else {
   // OFF
}
var userId = "1234abcd";
if (Apptimize.isFeatureFlagEnabled("feature_flag_variable", userId)) {
   // ON
} else {
   // OFF
}
userId = "1234abcd";
if Apptimize.isFeatureFlagEnabled("feature_flag_variable", userId):
   # ON
   pass
else:
   # OFF
   pass
Back on the Apptimize dashboard, you can proceed through Steps 1 and 2 to set your allocation and targets. By default, the feature flag is targeted to all eligible platforms (i.e. platforms with the Apptimize SDK installed.) If you wish to filter to users who fulfill certain conditions, add these criteria under their respective platforms in the Targets section.
Step 3 involves setting pilot users.

Step 2: Setting allocation and targets
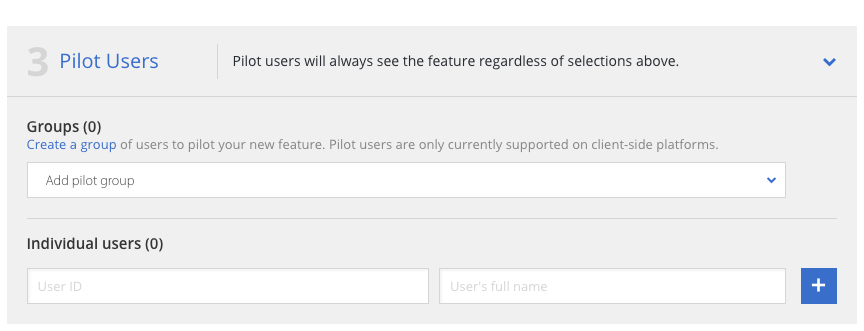
Step 3: Setting pilot users
Important
Pilot users are currently only supported on our client-side SDKs (Android, iOS, JavaScript, and React Native) and REST API.
Once your feature flag is implemented and ready to go, press the Turn On Now button to confirm your settings and launch the flag.
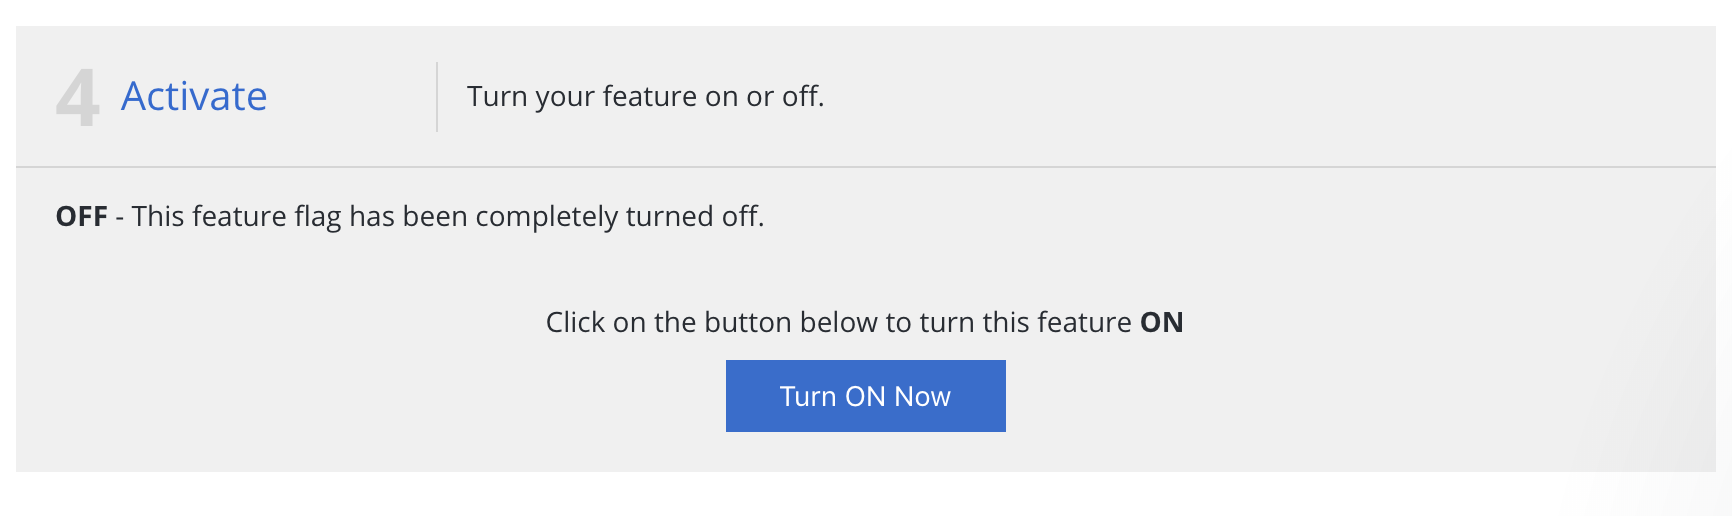
The flag will be turned on for the users defined in your previous steps and you can toggle the status, allocation, or targeting of the flag at any point via this screen. If you need to pass additional parameters such as user ID or custom attributes, below is the method format for including these values:
String userId = "user123";
Map<String, Object> myCustomAttributes = new HashMap<String, Object>() {{
   put("attribute1", 123456789);
   put("attribute2", "Attribute 2");
   put("attribute3", true);
}};

// Returns true or false depending on whether the feature flag
// is on for the given User ID and dictionary of custom attributes
Apptimize.isFeatureFlagEnabled("feature_flag_variable",
   userId,
   myCustomAttributes);
var userId = "user123";
var myCustomAttributes = {
   "attribute1" : "123456789",
   "attribute2" : "Attribute 2",
   "attribute3" : "Attribute 3"
};

// Returns true or false depending on whether the feature flag
// is on for the given User ID and dictionary of custom attributes
Apptimize.isFeatureFlagEnabled("Feature Flag Name",
   userId,
   myCustomAttributes);
userId = "user123"
myCustomAttributes = {
   "Gender" : "Female",
   "Height" : 170.5,
   "Age" : 52
}

# Returns True or False depending on whether the feature flag
# is on for the given User ID and dictionary of custom attributes
Apptimize.isFeatureFlagEnabled("Feature Flag Name",
              userId,
              myCustomAttributes)
A/B Experiments
For server-side testing, we support dynamic variable and code block A/B Experiments.
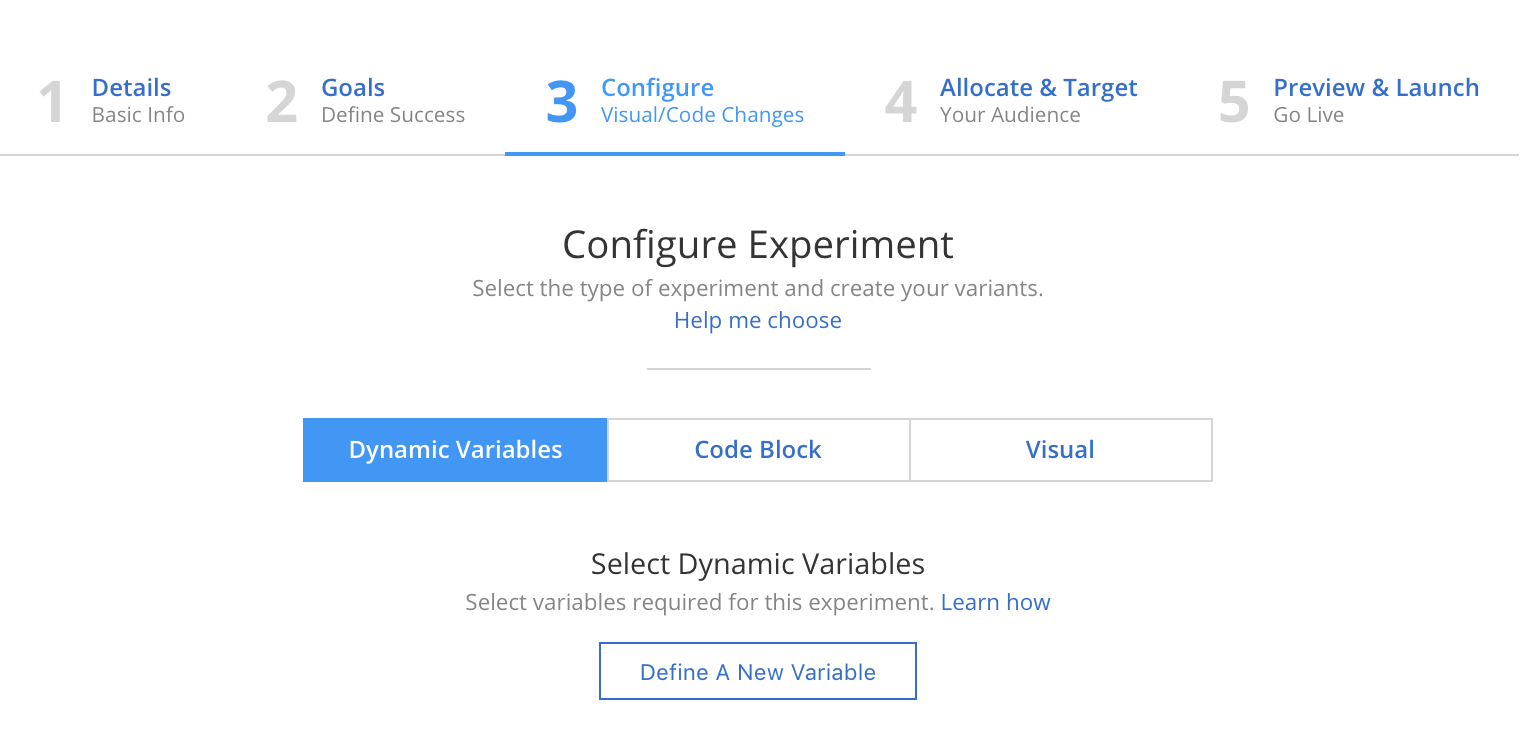
Create an A/B Experiment by clicking Create from your Apptimize dashboard and choose A/B Experiment. Fill out your experiment details, set your goals and define the type of experiment: dynamic variable or code block.
For web testing, we support dynamic variable and code block A/B Experiments. Visual experiments created with our WYSIWYG Visual Editor will be specific to the mobile platform they were created on (we do not currently offer a Visual Editor for Web or Server-Side experiments).
Important
Instant updates and visual experiments created with our WYSIWYG Visual Editor only apply to the mobile platform (iOS or Android) that they were created on.
Create an A/B Experiment by clicking Create from your Apptimize dashboard and choose A/B Experiment. Fill out your experiment details, set your goals (similar to mobile instructions) and define the type of experiment (Dynamic Variable or Code Block) in Step 3 (Configure).
Tip
Dynamic variables across your experiments can be created or hidden at any point from Manage -> Dynamic Variables in the top-right menu:

Dynamic Variable A/B Experiment
An Apptimize dynamic variable is a variable that has been defined on the Apptimize dashboard and your code, whose value can be changed from the dashboard. For web or server-side experiments, dynamic variables must be first manually defined in the Apptimize dashboard since they will not be automatically imported (as they were in mobile). The steps below will guide you through how to manually set up a dynamic variable for use in Apptimize Cross-Platform.
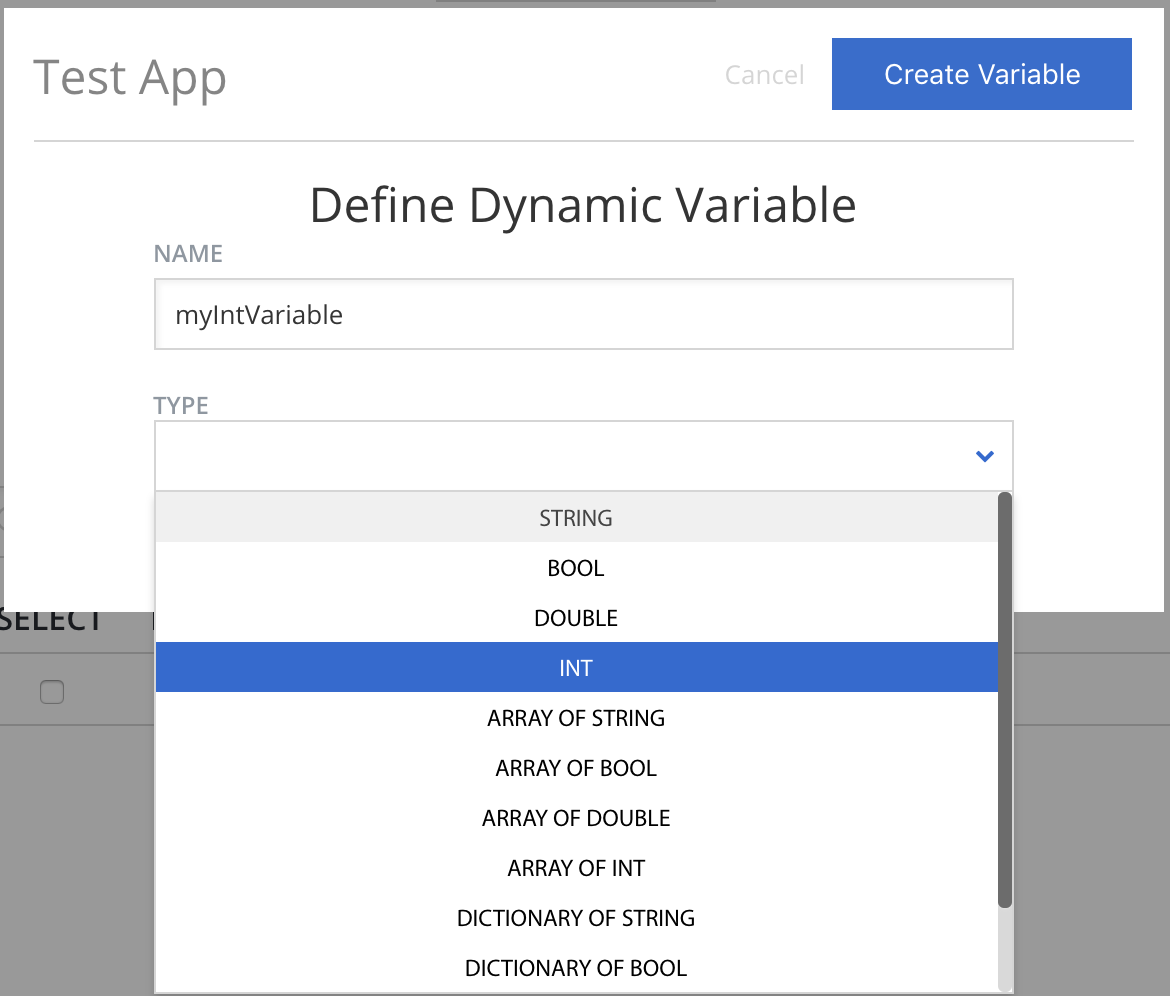
Defining Dynamic Variables
Define your dynamic variables on the Apptimize dashboard in Step 3 (Configure) of your Experiment Setup.
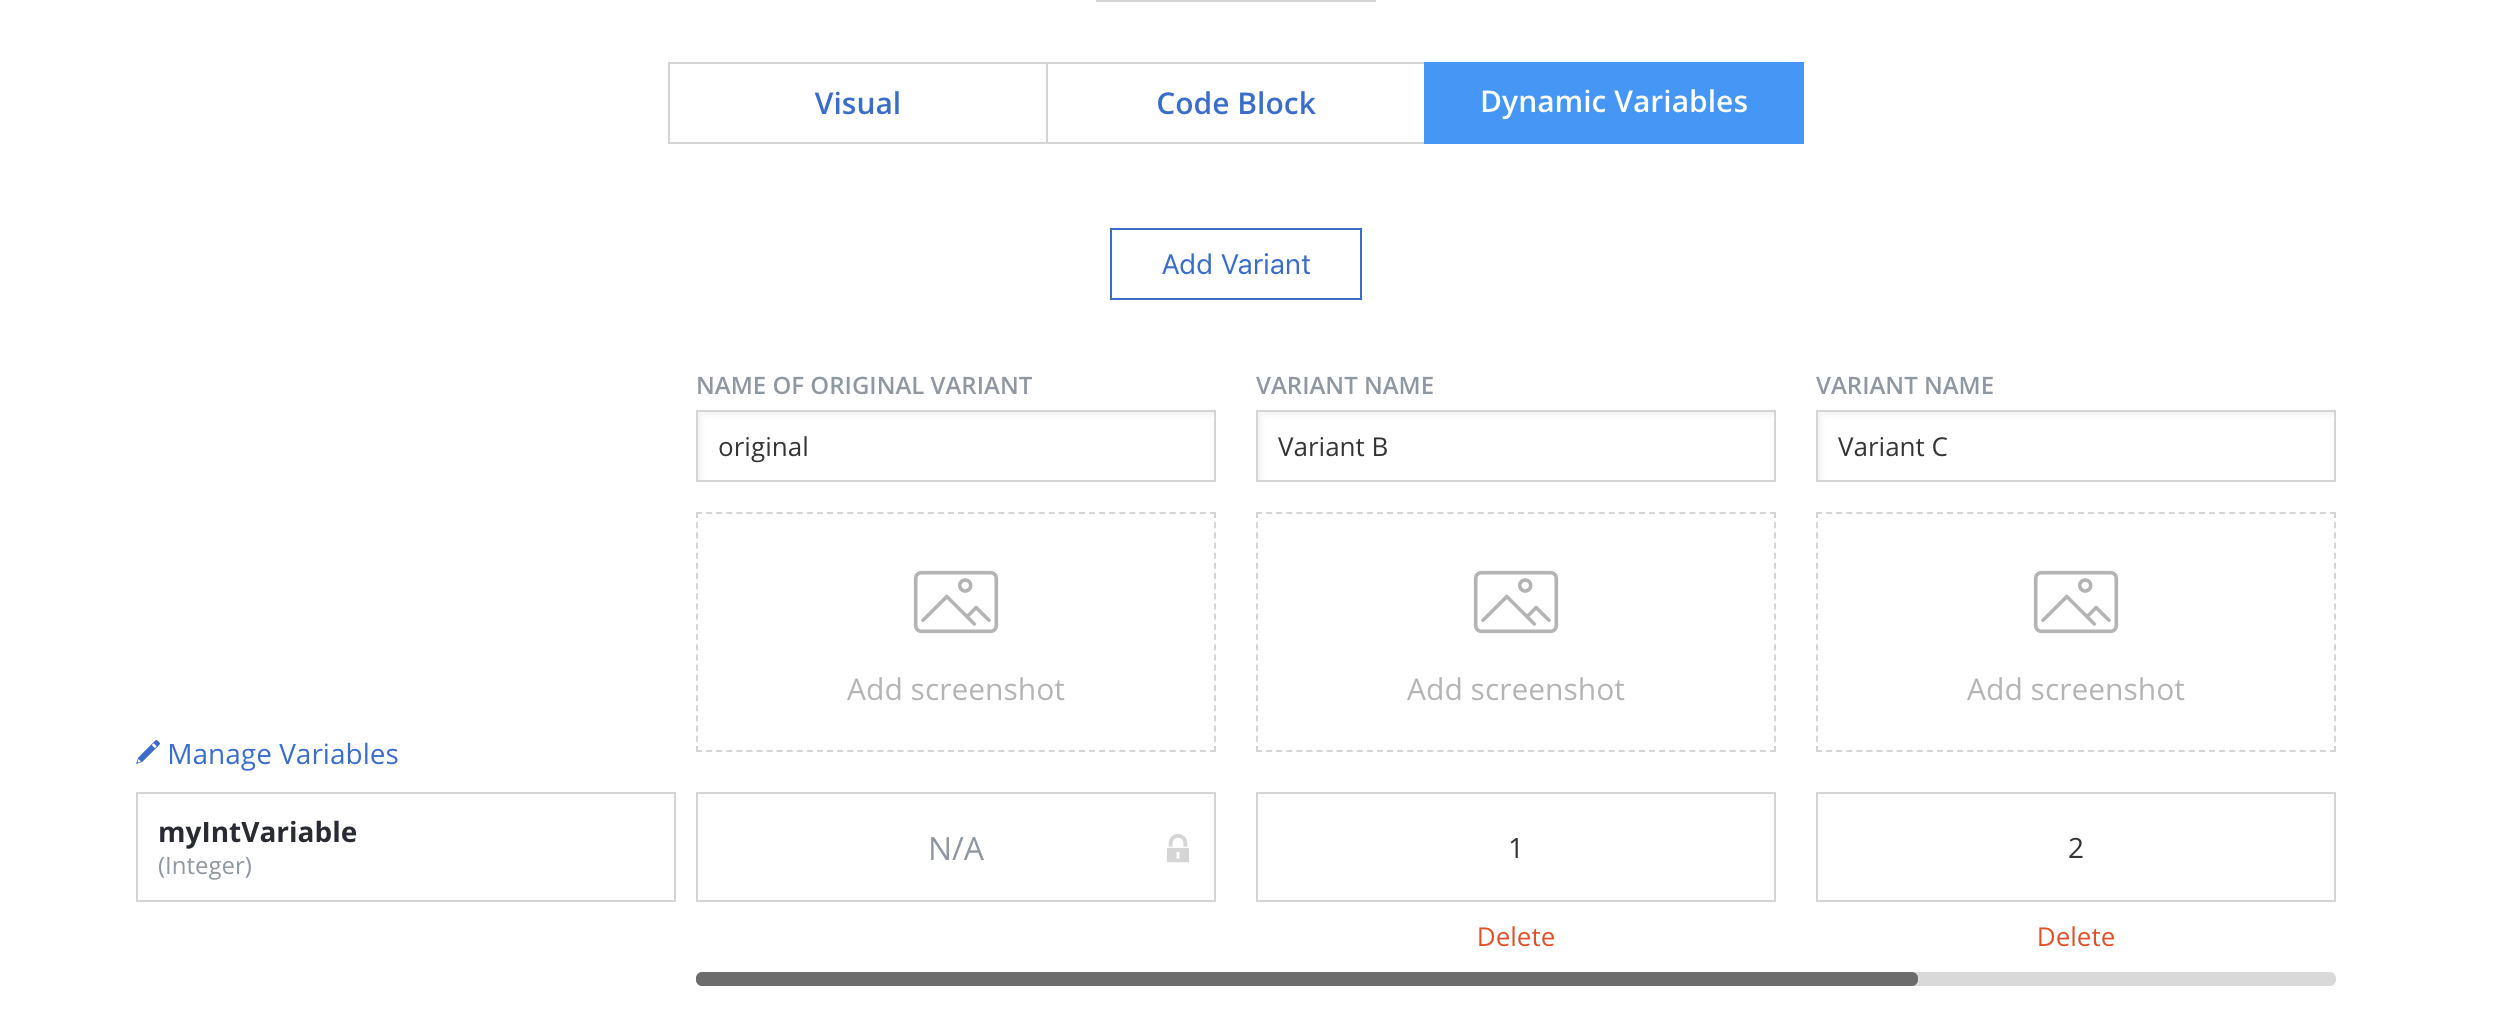
Click Define A New Variable to set a name and type for your variables.
After creating your variables, confirm the selection of the variables that will be used in your experiment. You will then be able to modify the values for your variable(s) across your variants, similar to below:
Retrieving Dynamic Variables
The next step is to retrieve the dynamic variable and query its value where needed across your various platforms (mobile, server-side, client-side). Depending on the variable type, we have corresponding get method for retrieving their values; please refer to our API for a comprehensive list.
Below, is an example of the getInt method which retrieves an integer. Note
that the second parameter also requires that you define a default value that the
variable should return in the baseline:
// In this example, we set the default value of categoryCount to 3
String userId = "1234abcd";
int variantInt = Apptimize.getInt("categoryCount", 3, userId);
// Returns the Integer value of myIntVariable depending on the user's
// variant
// Returns "123" if the user is in the original/base-case
var userId = "1234abcd";
Apptimize.getInt("myIntVariable", 123, userId);
// Returns the Integer value of myIntVariable depending on the user's
//variant
// Returns the default value "123" if the user is in the original/base-case
var userId = "1234abcd";
var variantInt = Apptimize.getInt("myIntVariable", 123, userId);
# Returns the Integer value of myIntVariable depending on the user's
# variant
# Returns "123" if the user is in the original/baseline
userId = '1234abcd'
Apptimize.getInt("myIntVariable", 123, userId)
With user identification, the value for the variable will be the same across all platforms where it is queried. For instance, users bucketed to a variant on web will see the same treatment on mobile.
Dynamic variables across your experiments can be created or hidden at any point from Manage -> Dynamic Variables in the top-right menu:
Code Block A/B Experiments
- JavaScript
Code blocks require an explicitly defined function for each variant.
- Java
Code blocks are defined as a class with one method for each variant.
- Python
Code blocks are defined as a dictionary that maps variant names (as keys) to function callbacks (as values)
The variant names (methods) will always be “baseline”, “variation1”, “variation2”, etc. As you configure your code block in Step 3 of your experiment setup, you can generate a code snippet based on the code block variable you defined:
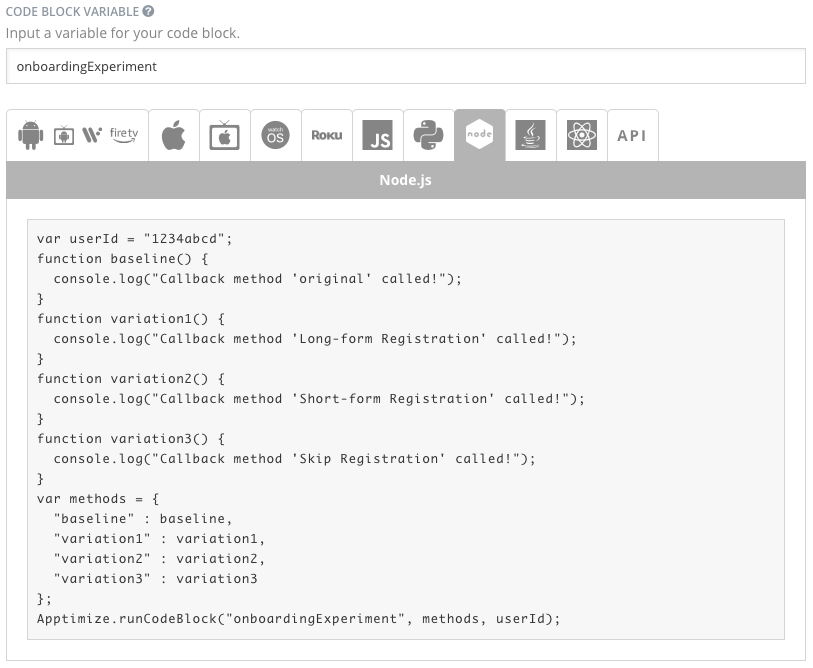
Node.js example

JavaScript example
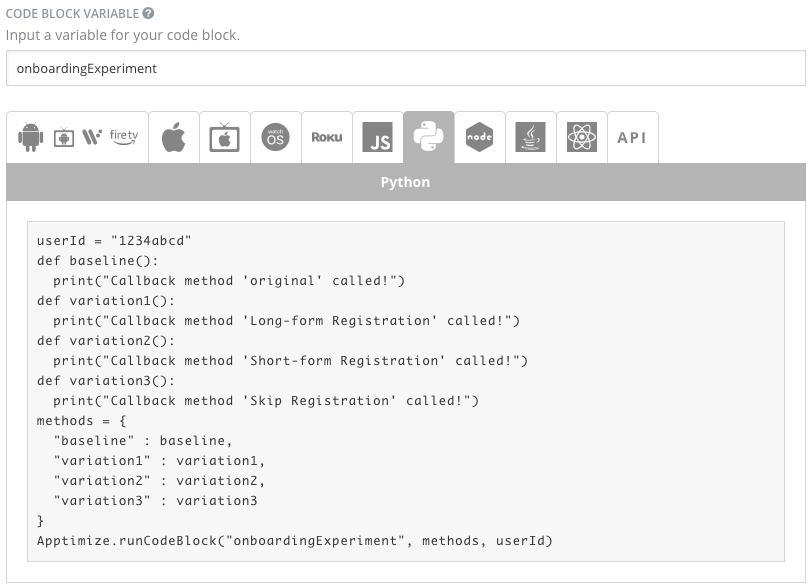
Python example
We recommend generating the snippet from your experiment to limit the possibility of errors. You should include the method to run the code block where you want participation in the experiment to be triggered:
String userId = "1234abcd";
static class CBHandler {
           public void baseline() {
                   System.out.println("original");
           }
           public void variation1() {
                   System.out.println("Variation 1");
           }
}
Apptimize.runCodeBlock("myCodeBlockExperiment", new CBHandler(), userId);
// myCodeBlockExperiment is the "Code Block Variable" on the Dashboard
// codeBlockMethods is the dictionary defined in the previous step.
Apptimize.runCodeBlock("myCodeBlockExperiment", codeBlockMethods);
var userId = "1234abcd";
function baseline() {
      console.log("Callback method 'original' called!");
}
function variation1() {
      console.log("Callback method 'Variant B' called!");
}
var methods = {
      "baseline" : baseline,
      "Variant B" : variation1
};

Apptimize.runCodeBlock("onboardingExperiment", methods, userId);
# myCodeBlockExperiment is the "Code Block Variable" on the Dashboard
# methods is the dictionary defined in the previous step.
Apptimize.runCodeBlock("myCodeBlockExperiment",
                       methods,
                       userId,
                       myCustomAttributes)
For whichever variant users are bucketed in, they will see the corresponding code block executed.
Targeting & Launching
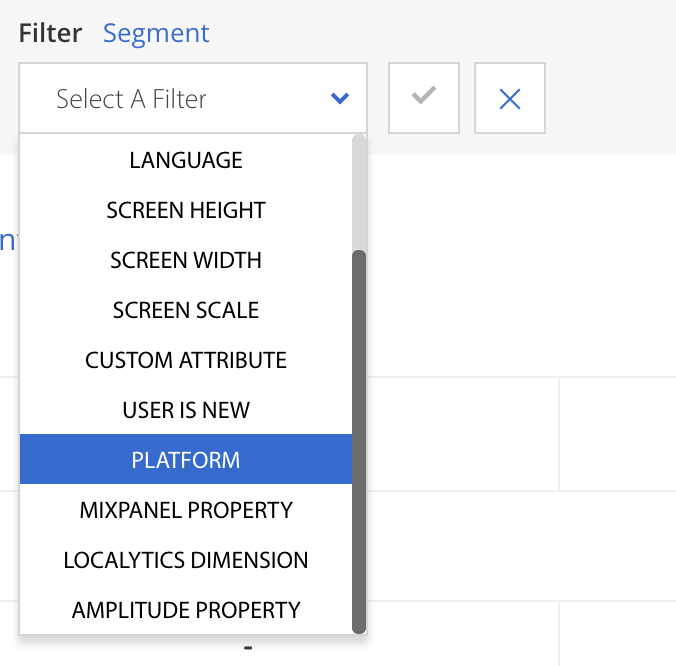
After configuring your experiment, you can set the targeting and allocation criteria in Step 4 (Target & Launch). By default, if you have no filters, your experiment will be targeted to users across all platforms for which you have the Apptimize SDK installed. Click Turn On Platform Filters and choose the platforms you’d like to apply the filters for:
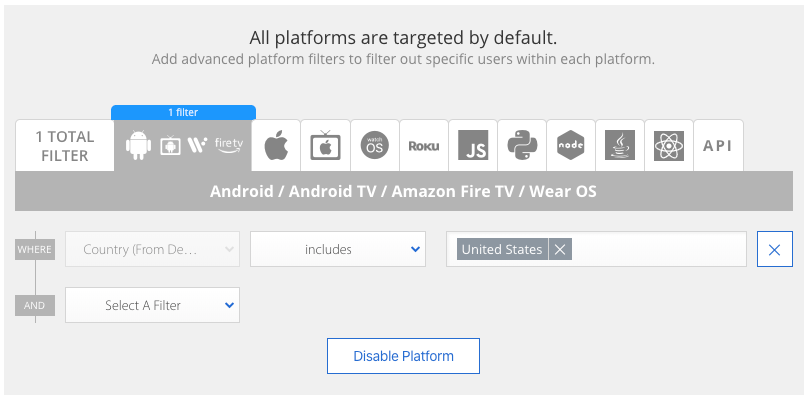
In this example, we’ve set one filter to target Android users who are in the United States. You can apply this same filter across platforms you are planning to run the experiment on and/or add additional filters as desired.
Simply select the property by which you want to filter, choose the comparator, and then start typing the criteria (a selectable list of options will pop up). Note that Preview is currently only enabled for mobile.
When you are happy with your Experiment setup, click Launch Experiment to set it live. You may continue to manage the experiment from your Apptimize dashboard.
Important
Variant consistency through allocation changes (i.e. stickiness) is currently only applied in mobile implementations.
Custom Attributes
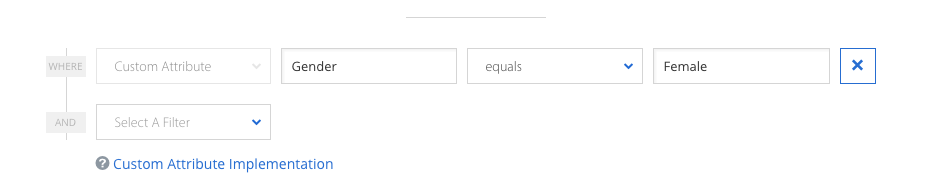
Custom attributes enable you to target based on any user characteristic that you can obtain programmatically. All you have to do is select Custom Attribute and enter the name of the targeting criteria like so:
Your custom attributes should be formatted as a Java HashMap, JavaScript object, or Python dictionary. You can then pass this data as an optional parameter to the methods you use and the attributes will be compared with your targeting criteria:
// Note that you do not explicitly set the attributes in server-side SDKs
// and instead pass this dictionary where needed
// when executing an experiment or tracking an event
HashMap<String, Object> myCustomAttributes = new HashMap<String, Object>();
myCustomAttributes.put("Gender", "Female");
myCustomAttributes.put("Height", 170.5);
myCustomAttributes.put("Age", 52);

// Example of executing an experiment using custom attributes
Apptimize.runCodeBlock("myCodeBlockExperiment",
              new CBHandler(),
              userId,
              myCustomAttributes);
var myCustomAttributes = {
              "Gender" : "Female",
              "Height" : 170.5,
              "Age" : 52
};
Apptimize.setCustomAttributes(myCustomAttributes);
var myCustomAttributes = {
              "Gender" : "Female",
              "Height" : 170.5,
              "Age" : 52
};

Apptimize.runCodeBlock("myCodeBlockExperiment",
              methods,
              userId,
              myCustomAttributes);
custom_attributes = {
              "Gender" : "Female",
              "Height" : 170.5,
              "Age" : 52
              }

Apptimize.runCodeBlock("myCodeBlockExperiment",
              methods,
              userId,
              custom_attributes)
Once you have created and integrated a Custom Attribute, you can use it again for other projects (Feature Flags or A/B Experiments) without having to re-integrate it into your app. After the code snippets are placed in your app, they are not tied to a specific project and can be used in as many projects as you’d like. You can also filter on custom attributes when analyzing results to understand how any experiment affected a particular segment of users.
Important
JavaScript implementation
The
setCustomAttributesmethod overwrites any existing object of attributes with the object that you pass in as a parameter.Therefore, if you want to append entries to your attributes, copy the existing object to
setCustomAttributeswith new entries. Otherwise you will lose your older attributes.
Tracking
Just like mobile, you can use Apptimize’s native tracking method for events if
needed. To track an event, use the track method as follows:
HashMap<String, Object> myCustomAttributes = new HashMap<String, Object>();
myCustomAttributes.put("Gender", "Female");
myCustomAttributes.put("Height", 170.5);
myCustomAttributes.put("Age", 52);

String userId = "1234abcd";
Apptimize.track("event-name", userId, myCustomAttributes);
Apptimize.track("Button clicked");
var myCustomAttributes = {
              "Gender" : "Female",
              "Height" : 170.5,
              "Age" : 52
};

Apptimize.track("eventName", userId, myCustomAttributes);
custom_attributes = {
              "Gender" : "Female",
              "Height" : 170.5,
              "Age" : 52
              }

Apptimize.track("event-name",
              CustomerUserId,
              custom_attributes
)
If you wish to include a value in your event, use the trackValue
method. The value must be a double precision floating point value.
HashMap<String, Object> myCustomAttributes = new HashMap<String, Object>();
myCustomAttributes.put("Gender", "Female");
myCustomAttributes.put("Height", 170.5);
myCustomAttributes.put("Age", 52);

String userId = "1234abcd";
Apptimize.trackValue("event-name", 123.12, userId, myCustomAttributes);
Apptimize.trackValue("User Checked Out", cartValue);
var myCustomAttributes = {
              "Gender" : "Female",
              "Height" : 170.5,
              "Age" : 52
};

Apptimize.trackValue("eventName", value, userId, myCustomAttributes);
custom_attributes = {
              "Gender" : "Female",
              "Height" : 170.5,
              "Age" : 52
              }

Apptimize.trackValue("event-name",
              cartValue, CustomerUserId,
              custom_attributes)
Analyzing Results
Apptimize automatically bundles a user’s results based on the User ID across all platforms. In your Experiment Results, you are able to filter on any identified user’s treatment and conversions from platform to platform.
See our Results documentation for more information on how to interpret your results. If you have any questions, reach out to support@apptimize.com