Android / Wear OS / Android TV / Fire TV
Apptimize supports experimentation and release management on Android, Wear OS (formerly Android Wear), Android TV, and Amazon Fire TV through our Android SDK.
The Apptimize Android SDK is compatible with Android 8.0+ (API 26+).
EU Cloud Site
Use the ApptimizeOptions method to set your server region to EUCS if you are integrated in our EU Cloud site.
 String apptimizeAppKey = "YOUR_APP_KEY";
 ApptimizeOptions apptimizeOptions = new ApptimizeOptions();
 apptimizeOptions.setServerRegion(ApptimizeOptions.ServerRegion.EUCS);
 Apptimize.setup(context, apptimizeAppKey, apptimizeOptions);
 val apptimizeAppKey = "YOUR_APP_KEY"
 apptimizeOptions: ApptimizeOptions = ApptimizeOptions()
 apptimizeOptions.setServerRegion(ApptimizeOptions.ServerRegion.EUCS)
 Apptimize.setup(context, apptimizeAppKey, apptimizeOptions)
SDK Installation
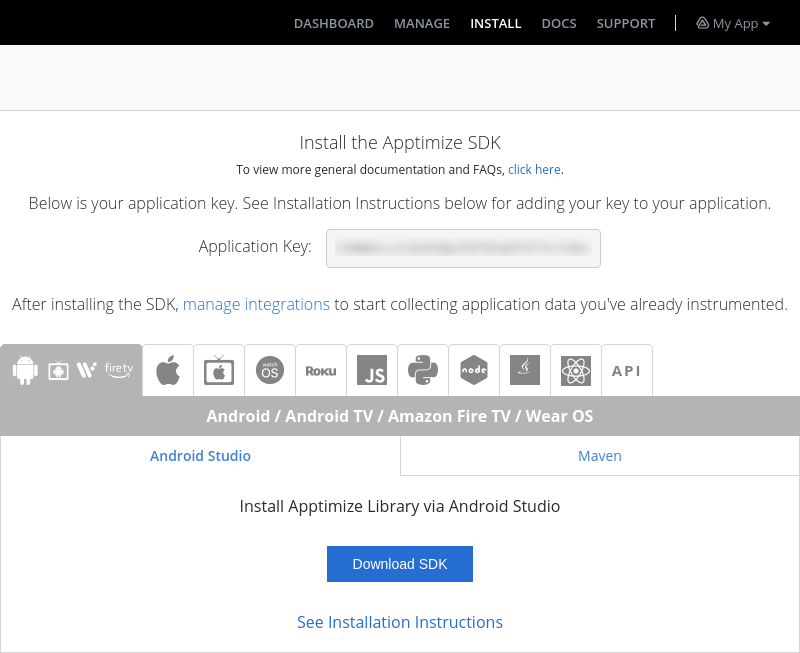
Before installing the SDK, sign in to the Apptimize dashboard and select one of your apps on the top navigation menu. Then, go to the INSTALL tab and choose the Android / Android TV / Amazon Fire TV / Wear OS platform.
See also
You have three options for installing the Android SDK:
Note
The Wear OS and Android TV SDKs use the same library as the Android SDK and have the same setup steps.
Android Studio
Sign in to your Apptimize dashboard and download the Apptimize Android SDK installation package. In Android Studio, add the SDK as a dependency to your project.
See also
- Android Studio Documentation:
Maven
Apptimize is hosted as a Maven repository.
Add the appropriate repositories.
If using POM files:
<repository>
  <id>apptimize-repo</id>
  <url>https://maven.apptimize.com/artifactory/repo</url>
</repository>
If using Android Studio with the Maven Plugin:
repositories {
  maven { url 'https://maven.apptimize.com/artifactory/repo' }
}
Add the appropriate dependencies.
If using POM files:
<dependency>
  <groupId>com.apptimize</groupId>
  <artifactId>apptimize-android</artifactId>
  <version>[5.0.0,)</version>
</dependency>
If using Android Studio with the Maven Plugin, update the dependencies block in your
build.gradlefile to include the following implementation configuration to automatically get the latest version of Apptimize:AAR format:
dependencies {
     implementation 'com.apptimize:apptimize-android:3.+@aar'
}
JAR format:
dependencies {
     implementation 'com.apptimize:apptimize-android:3.+'
}
The JAR format is deprecated
The JAR format is deprecated and will be removed in one of the future releases.
Initializing Apptimize
In both the Android Studio and Maven setup options, you will need to handle initialization of the Apptimize SDK yourself.
In any files that you use Apptimize, you’ll need to add one or both of the following import statements:
import com.apptimize.Apptimize;
import com.apptimize.ApptimizeTest;
They’ll look something like this when you’re done:
import android.os.Bundle;
import android.app.Activity;
import android.view.Menu;
import com.apptimize.Apptimize;
import com.apptimize.ApptimizeTest;

public class ToDoActivity extends Activity {
  ArrayList<String> items;
  ArrayAdapter<String> itemsAdapter;
  ListView lvItems;
  ...
}
Next, call
Apptimize.setup()from either yourApplicationsubclass (if you have one) or all of your activities’onCreate()methods like this:public class ToDoActivity extends Activity { @Override protected void onCreate(Bundle savedInstanceState) { super.onCreate(savedInstanceState); setContentView(R.layout.activity_todo); // Insert your App Key here Apptimize.setup(this, "XXXxxXXxxxXXXxxXXxxxXXXxxXXxxxX"); ... } ... }
Replace the placeholder with your application key, which is a 31 character key that can be found on the installation instructions while logged in or in your Admin app settings. We recommend that
Apptimize.setup()be called on the main thread, or in some other manner that ensuresApptimize.setup()completes before the Application’sonCreate()method completes.
Build your app to make sure that SDK was installed correctly. Verify that the
SDK is loading by running your app and checking the Android logcat for the
message Apptimize: Version 2.x.x.
You’ve finished the Apptimize installation and are ready to configure your first A/B experiment!
Segment or mParticle Integration Kit
You can install our Android SDK via our Segment or mParticle Integration Kits. You might want to use this option if you’re already tracking similar data with other services as you only need to send that data to Segment or mParticle once and will show up in Apptimize and other integrations with the flip of a switch.
Learn more about our Integration Kits here!
Wear OS, Android TV and Fire TV
Once the Android SDK is installed setup as described above, you will be able to execute experiments or query feature flags on any Android device where the SDK is deployed. If you want to target a specific Android OTT platform, you can do that via the Apptimize Dashboard.
Android TV
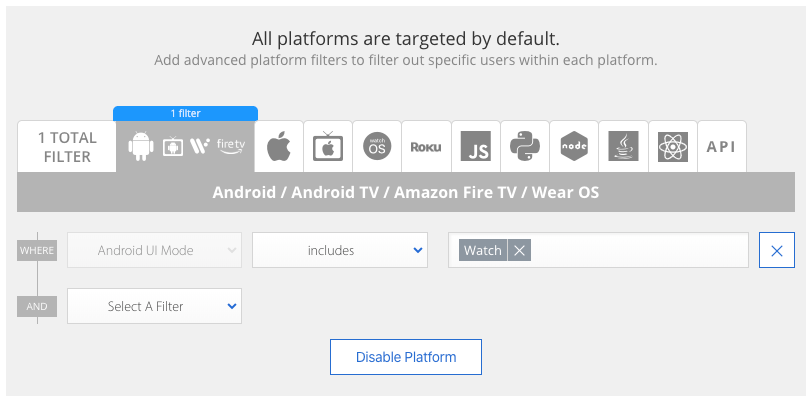
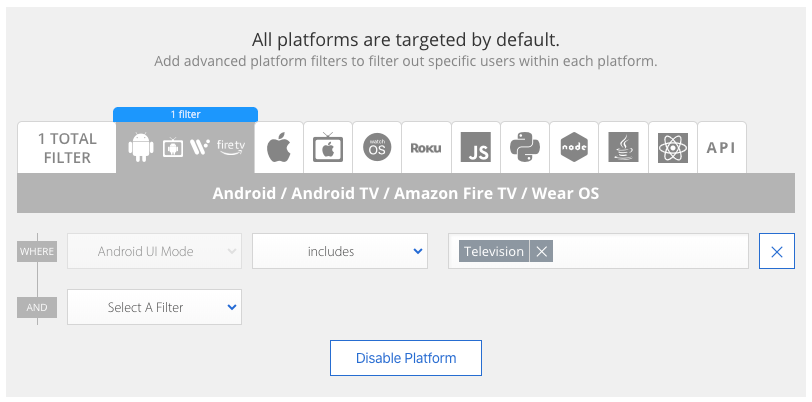
If you are looking to run an experiment on Android TV devices but don’t want the experiment to reach Android users who are running your app on other configurations (e.g. Mobile), you can use the Android UI Mode device property available in targeting. Note that this property is available in version 3.3+ of the Android SDK.
An Android UI Mode of “Television” indicates that the device has been configured for a “ten foot” experience.
See Android Developer Documentation for more detail about UI Mode.
Amazon Fire TV
To specifically target Amazon Fire TV devices, choose the Android UI Mode “Television” as described above, and also add a Device Brand filter for “Amazon.”

Wear OS
To specifically target Wear OS devices, choose the Android UI Mode “Watch” as described above