Allocate & Target
On the Allocate & Target page, you can set how many and which type of your users will participate in the experiment. This guide includes instructions on how to:
Allocate the percentage of users who should participate in this test
Set filters to target specific users or devices
Set custom attributes for more advanced targeting
Set groups for more advanced targeting
Allocate
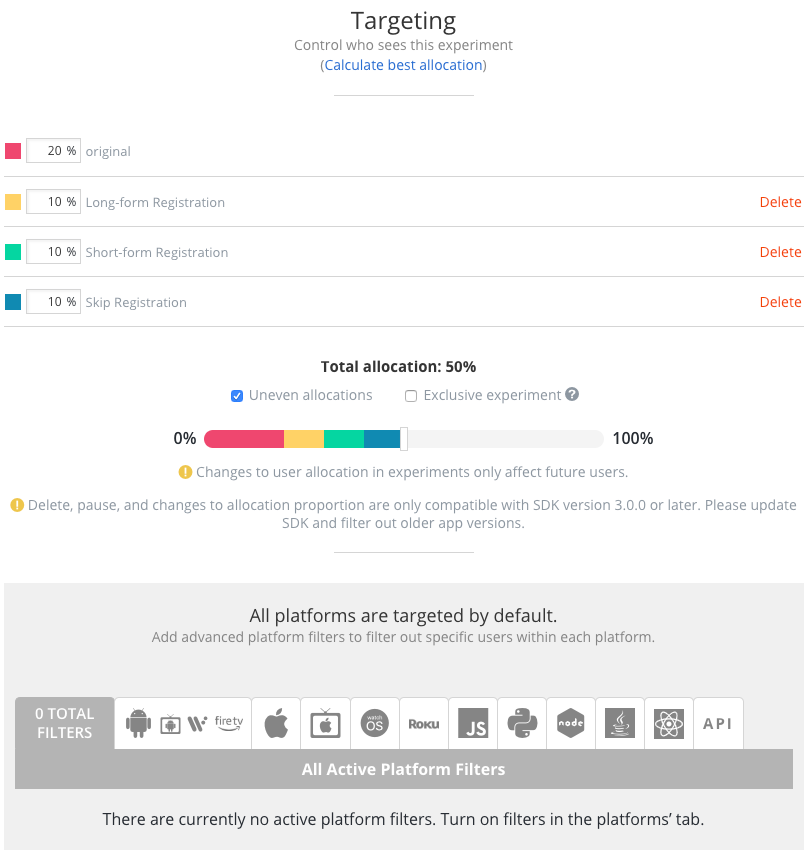
Adjust the allocation bar to set what percentage of your users will see the experiment. If you set it lower, to say 5%, that means that if your app gets 10,000 users per day, 500 users per day will see your experiment. If your experiment has 1 variant, 250 users will see the original app as a control group and 250 will see the variant.
If you want to distribute allocation of end users to variants unevenly, check the “Uneven allocations” box. Uneven allocation is helpful for conducting holdout experiments where you only want a small percentage of users to be allocated to the original baseline variant over a long period of time.

Note that if you select the Exclusive Experiment box, users in this experiment will not be eligible to participate in other experiments. This can reduce some measurement noise, but will also reduce your experiment capacity.
Note
Identified users are allocated to the same variant regardless of platform. Anonymous users are randomly allocated, and will continue to see their last seen variant even if they become identified on client SDKs.
Targeting
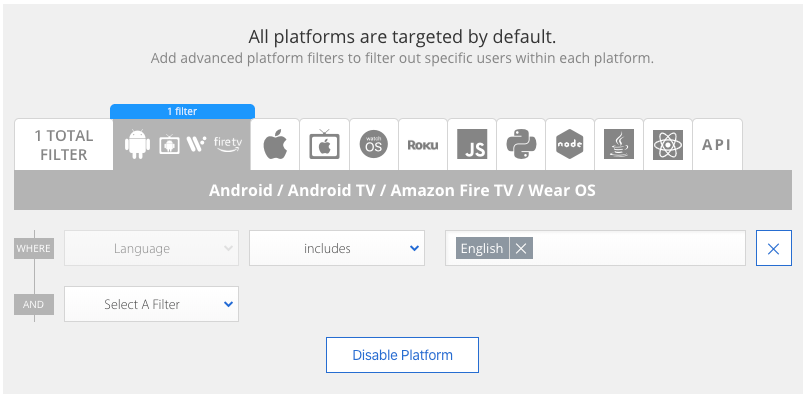
In addition to selecting the percentage of users to see this experiment, you can also specifically target users with certain attributes across your different platforms. By default, your experiment will be targeted to users across all platforms for which you have the Apptimize SDK installed. To target within a specific platform or to disable the experiment on certain platforms, click “Turn On Platform Filters.”

In this example, we’ve set one filter to target Android users who are in the United States. You can apply this same filter across platforms you are planning to run the experiment on and/or add additional filters as desired. Here is a complete list of out-of-the-box attributes that you can target on:
Native Mobile and OTT (iOS and Android) * Country: The user’s country according to their device settings. Note this is not necessarily the country the user is physically located in according to GPS. * Device Model: The user’s device model (e.g. “iPad4,1” (iPad Mini Air), “iPhone4,1” (iPhone 4S)).
Language: The user’s language according to their device settings.
Screen Height: The height of the user’s device screen in pixels.
Screen Width: The width of the user’s device screen in pixels.
Screen Scale: The device’s screen scale or density.
OS Version The iOS or Android version the user’s device is running (e.g. 11.0.0 (iOS), 5.0 (Android)).
User is New: Only new users who run the app for the first time after the experiment is started. The user’s participation in the experiment is maintained as long as the experiment remains running. If experiment is stopped and restarted, the User is New filter will use the latest start time of the experiment to qualify experiment participants.
App Version: The app version as shown in the store (e.g. 2.5.2).
Mixpanel Property: If you are using Mixpanel’s super properties, these properties will show up as available for targeting.
Localytics Property: If you are using Localytics’ properties, these properties will show up as available for targeting.
Firebase Property: If you are using Firebase’s user properties, these properties will show up as available for targeting.
Amplitude Property: If you are using Amplitude’s user properties, these properties will show up as available for targeting.
In addition to the properties above, the Android SDK supports the following attributes:
Device Brand: The user’s device manufacturer (e.g. “Samsung”, “Huawei”).
Android UI Mode: The device’s current UI Mode. configuration (e.g. “Normal” (Mobile), “Television”, “Appliance”, “Watch”, “VR Headset”).
React Native
App Version: The app version as defined when Apptimize is initialized.
Operating System: The operating system the app is deployed on (e.g. Android, iOS, tvOS).
OS Version: The iOS or Android version the user’s device is running. React Native OS Versions contain only the major and minor categories. (e.g. 11.0 (iOS), 5.0 (Android)).
Screen Height: The height of the user’s device screen in pixels. This does not take DPI into account.
Screen Width: The width of the user’s device screen in pixels. This does not take DPI into account.
Web
App Version: The app version as defined when Apptimize is initialized.
Language: The user’s language according to their browser.
Browser Name: The type of browser the being used (e.g. Chrome, Firefox, Internet Explorer).
Browser Version: The version of the browser.
Server
App Version: The app version as defined when Apptimize is initialized.
REST API
App Version: The app version as optionally defined in the header of each API request.
Operating System: The source of the API request as optionally defined in the header of each API request (e.g. “Ruby”, “Data Warehouse”).
Operating System Version: The version tied to the source of the API request as optionally defined in the header of each API request.
Roku
Version Number: The app version as defined when Apptimize is initialized.
OS Version The Roku version the user’s device is running.
Simply select the property by which you want to filter, choose the comparator, and then start typing a criterion (a selectable list of options will pop up). Note that additional targeting properties are available for web testing as well.
You can select more than one targeting filter. Note that multiple filters within a specific platform will have an AND relationship. As in, if you create the filter “Device Model is in iPhone 4″ and “Language is in English,” the only users who will see the experiment are users whose devices are iPhone 4′s that are also in English. Someone who is on an iPhone 4 in Chinese will not qualify for the experiment. Someone on an iPhone 5 in English would also not qualify.
Custom Attributes
Apptimize also allows you to programmatically set attributes on which you can target. Custom Attributes enable you to target based on any user characteristic that you can obtain programmatically. All you have to do is select Custom Attribute and enter the name of the targeting criterion like this:

A code snippet will appear below the targeting filters once you click Set Filter. Insert the code snippet into your app where the information is being gathered so that the criterion can be passed to Apptimize.
Apptimize.setUserAttribute("Gender", "Female");
Apptimize.setUserAttribute("Height", 170.5);
Apptimize.setUserAttribute("Age", 52);
[Apptimize setUserAttributeString:@"Female" forKey:@"Gender"];
[Apptimize setUserAttributeDouble:170.5 forKey:@"Height"];
[Apptimize setUserAttributeInteger:52 forKey:@"Age"];
Apptimize.setUserAttributeString("Female", forKey: "Gender")
Apptimize.setUserAttributeDouble(170.5, forKey: "Height")
Apptimize.setUserAttributeInteger(52, forKey: "Age")
// In JavaScript, we expect a Dictionary of your custom attributes to be passed to our method
var myCustomAttributes = {
      "Gender" : "Female",
      "Height" : 170.5,
      "Age" : 52
};
Apptimize.setCustomAttributes(myCustomAttributes);
// Note that you do not explicitly set the attributes in server-side SDKs and instead
// pass this hash map where needed when executing an experiment or tracking an event
val myCustomAttributes: HashMap<String, Any> = HashMap<String, Any> ();
myCustomAttributes.put("Gender", "Female");
myCustomAttributes.put("Height", 170.5);
myCustomAttributes.put("Age", 52);
// Note that you do not explicitly set the attributes in server-side SDKs and instead
// pass this dictionary where needed when executing an experiment or tracking an event
var myCustomAttributes = {
      "Gender" : "Female",
      "Height" : 170.5,
      "Age" : 52
};
# Note that you do not explicitly set the attributes in server-side SDKs and instead
# pass this dictionary where needed when executing an experiment or tracking an event
myCustomAttributes = {
      "Gender" : "Female",
      "Height" : 170.5,
      "Age" : 52
}
# custom attributes should be included with all calls to user-level API endpoints

# illustrative example of custom attributes with an experiment endpoint
curl -X GET \
-H "ApptimizeApiToken: <ApiToken>" \
-G --data-urlencode "customAttributes={\"<custom-attribute-name>\":<value>}" \
https://api.apptimize.com/v1/users/<user-id>/code-blocks/<code-block-name>


# illustrative example of custom attributes with an event endpoint
curl -X POST \
-H "ApptimizeApiToken: <ApiToken>" \
-F "customAttributes={\"<custom-attribute-name>\":<value>}" \
https://api.apptimize.com/v1/users/<user-id>/events/<event-name>
' Custom attributes should be included with all calls to execute an experiment or track an event

' illustrative example of custom attributes with an experiment method
m.requestId = m.apptimize.callFunc("getInt", {userid: <user id>, name: "<var name>", defaultValue: <default value>, customAttributes: {<custom-attribute-name>:"<value>"}})


' illustrative example of custom attributes with an event method
m.requestId = m.apptimize.callFunc("track", {userid: <user id>, name: "<event name>", customAttributes: {<custom-attribute-name>:"<value>"}})
Note that once you have created and integrated an attribute, you can use it again for later projects (Feature Flags or A/B Experiments) without having to re-integrate into your app. Once the code snippets are placed in your app, they are not tied to a specific project and can be used in as many projects as you’d like. You can also filter on custom attributes when analyzing results, to understand how any experiment affected a particular segment of users.
After allocating and targeting your experiment, you’re ready to view a summary of the experiment and launch the experiment to end users.
Groups
Apptimize allows you to specifically include or exclude groups of users in an experiment. The groups are defined by the list of user IDs you upload to Apptimize. You must send your internal userID to Apptimize using the Pilot Targeting in order to enable this feature. See Pilot Users and the Feature Flag Installation Guide for more information.
Group Targeting is currently only available for client-side SDKs (Android, iOS, JavaScript, and React Native) and REST API.

Unlike the Pilot Users feature in Feature Flags, groups targeting in experiments does not bypass other targeting logic. Groups targeting works just like any other targeting logic. For instance, if you target users in version 2.1.1 and in Example Group 1. The users who end up being targeted are ones who are both in version 2.1.1 and in Example Group 1.
Targeting groups in experiments also does not bypass randomization. For instance, if an experiment is targeted to include only Example Group 1, Apptimize will randomly divide Example Group 1 users into control and variants. If you select a winning variant running the experiment, the variant will be launched to the targeted users by default. Unless you change the targeting logic, the winner is rolled out to the groups you target only. This is helpful for testing experiment set-up with internal user groups as well as beta user groups.
Device-level Consistency
On supported client platforms, users that participate in an experiment will continue to be allocated to their last seen variant regardless of allocation changes. This ensures consistency in user experience and results.
Device consistency will be cleared when an experiment is stopped, and the user could be allocated to a different variant if the experiment is restarted.


